Just to give you some background, up till the end of 2010, I lived and worked in the South Of Spain. It wasn’t only due to the recession that we made the decision to return to the UK, but Alex’s adult educational needs were the biggest influence as there were no provisions for him in Spain. So consequently, when we came back its was as if Richard and I were a newly married couple having to set up home all over again…..but with a 20 year old in tow too!
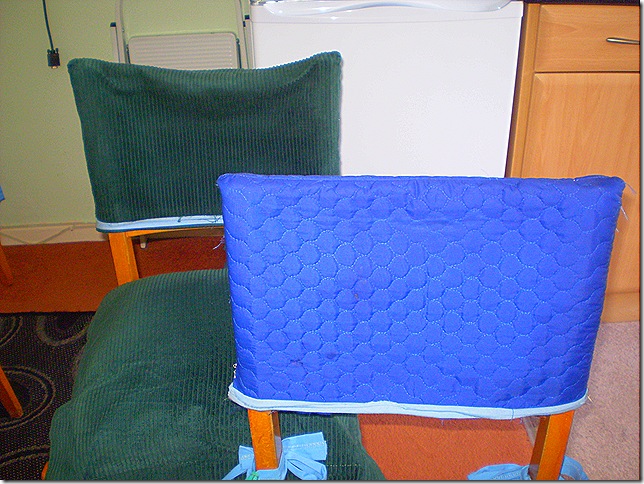
As you can appreciate, when I moved into our apartment, money was on a strict budget and I had to “make do” with the furniture in place, including the 1950’s kitchen chairs! So, I wanted to re vamp them as economically possible… Why not “mend and make do”!
The green corduroy cushions are made from fabric remnants I bought to make Alex a pair of dungarees from when he was a baby and off I went to borrow Mum’s sewing machine.
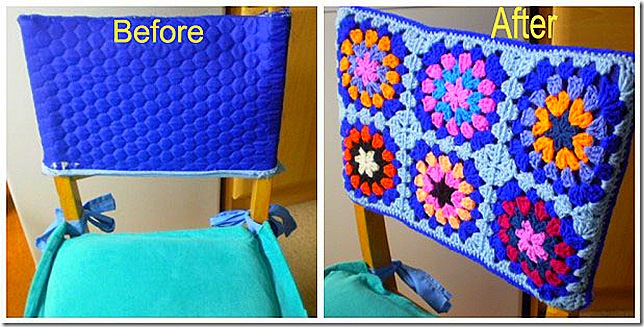
But, Alex being Alex, he’s a little “rough” on furniture and after one year they were well overdue an overhaul.. so this is what I came up with.
PS… just double click on the photos to get a bigger, more clear view if you need!
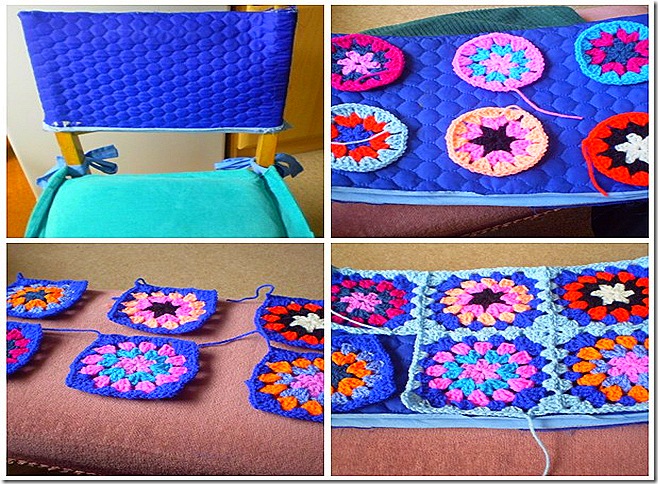
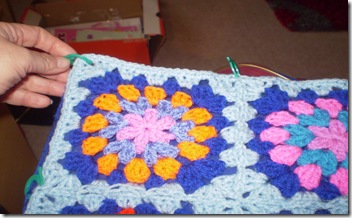
As you can see the chairs were pretty shabby.. so going back to a previous tutorial of my vintage blanket, ( https://helencrochet1.wordpress.com/2012/01/23/tuesday-tutorial-vintage-blanket/) make up your Flower in circle grannies.. measure out how many you’ll need and don’t forget you can allow for a little “stretching” here.. You’re better off making the final blocks a little smaller than the fabric you’re going to attach it to.. you wouldn’t want it to sag now would you! In this case 6 were just fine using the join as you go method to attach them together.
NB….Once you’ve established your sizes, give your crochet work a final round of single crochet around the edge, for a nicer, neater finish.
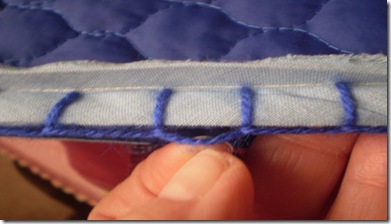
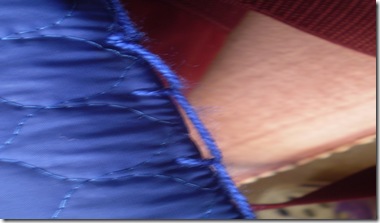
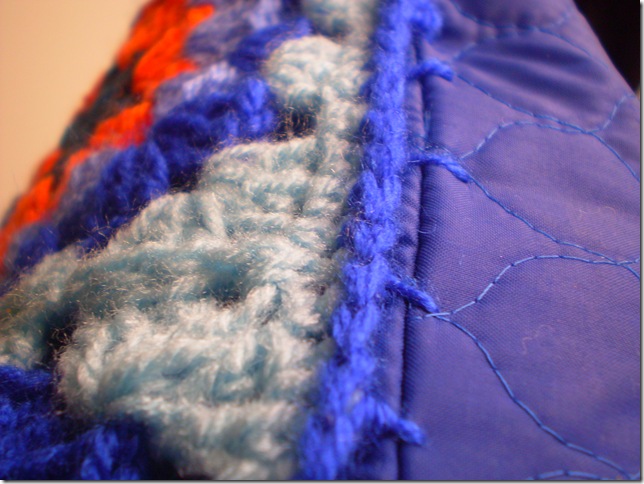
Essentially what you’re going to do now is a blanket stitch all around the edges of your fabric.. this is going to be your “anchor”.. What you’ll eventually “sew” your grannies to… Use the same yarn as the colour that will be on your final round… in this case navy blue.
If you’re not familiar with the blanket stitchthen this little video explains it beautifully. Don’t worry it’s a silent video but shows you exactly how to do the Blanket Stitch
http://www.youtube.com/watch?v=eXkSE2TTF4s
If you are going to sew to anything with zips then be sure not to stitch too close… or buy a cover with the zips perhaps in the centre of the fabric
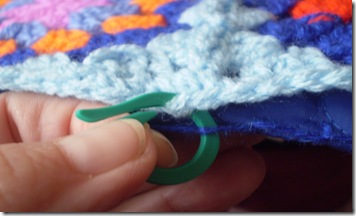
Ok.. Once you’ve gone all around your fabric, with the blanket stitch, measure your piece of crochet and secure either with stitch markers like I have or safety pins.. just to make sure that you get a nice even finish as you sew along
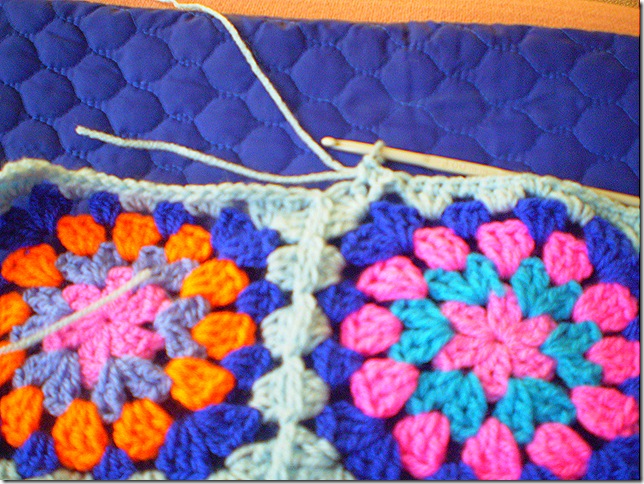
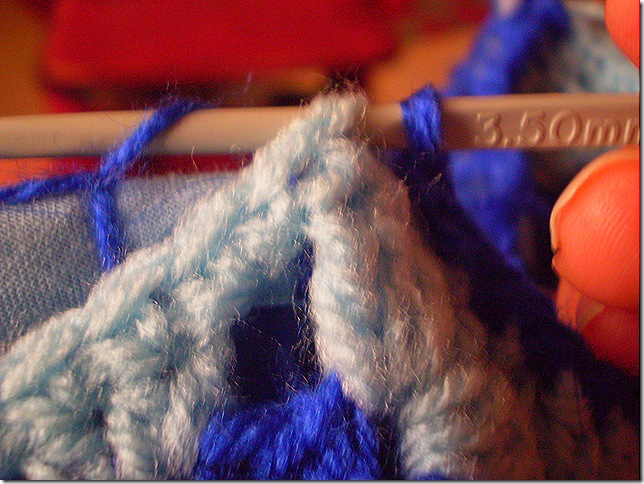
So now its time to drop down to a 3. 5 hook. Just to get a nice snug stitch all around in SINGLE CROCHET..
Place hook into the first corner of your work and through the blanket stitch on the fabric, yarn over and pull through, two loops on hook, yarn over and pull through both loops as in the pic .. Place at least two if not three single crochets in your corners….
Then, continue working all the chain stitches on your crochet work with a single crochet attaching the wool to the fabric/ blanket stitch in this fashion.. all the way around , ensuring you’re working tight into the fabric.. almost sealing it.
Now, weave in all lose ends, sit back and admire 🙂
If you have any questions, drop me a line on the comments… have a great day … Helen xxx

Oh wow, so simple once I see it! 😀 Thank you Helen *hug* 😀
So versatile too I imagine, this would be the same principle for crocheting onto the edge of towels, pillowslips etc? 😉
Hope you’re having a terrific Tuesday 🙂
Mo xx
What a relief Mo.. i always get nervous when doing a tut as I think … will they understand it.. am I explaining things right.. are my photos ok.. you must let me know if there’s anything you dont undertand.
I’m working on getting the other two finished today as Alex is out this afternoon and I’ll have time.
And there’s a couple of steaks in the fridge for Richards and I lunch..:-)
Great idea! I’ve been given a grey office chair. It’s comfy and swirlable but ugly. I’ve been thinking of yarn bombing it.
Thanks for the tute!
yeah yeah yeah…Go for it! i love the idea of yarn bombing my garden one night to see the neighbours face in the morning.. do you think we have an OCD problem???
Steak for lunch eh… Verry nice 🙂 With chips and salad, or fried onions and mushrooms? Oops, drooling on my keyboard there, haha 😉
Ooh Cat, that sounds like a great idea – remember to post pictures when it’s done 😉
I would pay to see someone’s yarn bombed garden hahaha. I particularly like the ‘crocheted’ bus – on behalf of wee man of course 😉
we shall have to do something whacky like a yarn bombing in the summer.. people are more forgiving when the sun is out!!
Garlic mushroomd and salad.. I’m paying for eating too much chocolate valentines day!
Hahah, Logan would love the Lidl’s promo bus.. xmas time they had a bus in the car park, with a grotto downstairs and the upper deck as a bar with free drinks and food samples!! Alex was in a mood that day but I loved it! Look out for it next year .
Definitely an improvement! 😉
xo,
wink
Hi Helen, Thanks for this tutorial. Like Baban Cat, I too have an office chair (1970s I think) which is really comfy but could do with a bit of a spruce up! So this is on the list of projects to do 🙂 Maggie xx
What a differance that is so neat Helen.
Love this and very simple to do.
This is the blanket I am making only I am not doing it with wool.
Could do this all day . It is so addictive.
Hello my lovely people,
I’m so pleased this is making sense to you . .I really get worried about tutorials and if they make sense to you all.
And Yoka… I know what you mean about the grannies being addictive.. cant wait to see what you all make with this idea… as you say.. it can be used on anything!! Just have fun with it. xxx
Have a stack of rounds ready and some squires.
My thumbs are so sore from crocheting but I just can’t stop.
Trying out combinations with colors.
Love the bright blue you used in your chair cover.
Had this year for a while and it is my first time I used this brand. Don;t think I will use it again some are thicker than others and I had several skeins that had real bad yarn too. Love the colors that is why I bought it in the first place.
Will make some pictures soon.
Now I know why you are so good in Spanish.
Thanks again Helen for the tutorial this is so much fun.
Luv,Yoka
xxx
Yoka,
Thank you .. its comments like these that make me smile each day.
I cant wait to see your work and find out the name of the yarn you’re using so that the other readers are aware of the bad quality!!
Look out soon for a little report I am preparing for hand health.. some tips so that you dont get sore hands or thumbs.
Again, many thanks
much love Helen x
That’s wonderful. What a great idea. I love your use of colors too.
Thank you .. i hope you have some fun with it too.
Regards
Helen
Excellant idea Helen and as usual very easy to follow xxx
Fantastic news that you all can follow x
Lots of hugs x
Thanks Helen for taking the time to do this tutorial! I have been curious as to how to do this! 🙂
Thanks to you for letting me know that you all can follow it.. onwards and upwards.. the weekend is here